The 5 Most Productive Kitchen Layouts
June 15, 2021
4 min read
4 min read
Today’s kitchens are used for so much more than just cooking. Nowadays, we want to be able to use it to eat, work, entertain, as somewhere for the kids to do their homework or for us to relax with the paper and a cup of coffee. The traditional separate dining room has also become redundant, with many people dreaming of a single dynamic cooking, living, dining zone that can accommodate all these needs and more.
It’s therefore vital that you select the best possible kitchen layout for the space you have, and there are many to consider. The size and shape of your room will be the main influencing factor. Consider the traditional working triangle rule, which positions the sink, fridge and cooked at each point to minimize the distance between them, but don’t feel too restricted by it. The way you plan to use the space takes priority and, more often than not, the space used will flow naturally anyway.
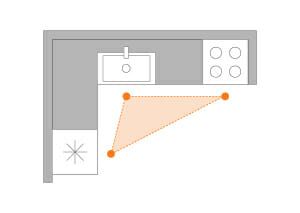
L-Shape
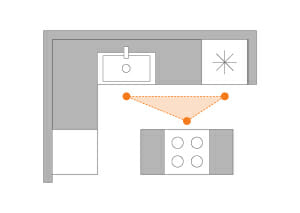
An L-shaped kitchen is probably the most versatile option, made up of two sets of units that meet at a right angle along adjacent walls. It can suit relatively small spaces but still feel spacious and open, with a strong triangle to provide the cook with ample work area.
Be sure to allow enough worktop space between each zone, usually the most effective placing sees the fridge and sink on one wall and the hob on the other. Even in a relatively small space, this design can incorporate a dining table on the disused wall if you’d like an eat-in kitchen.
Works best for: rectangular rooms and kitchen-diners.
U-Shape
A U-shape layout features three walls of cabinetry, ideal for both small, medium and large rooms as it offers versatile functionality. By placing one of the three key elements on each wall, you’ll maximise the amount of usable worktop around each appliance.
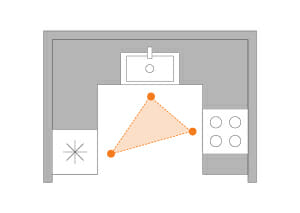
You’ll have enough space to position the hob and cooker at one end, with the sink and fridge parallel to each other to create the working triangle effectively. For best results, you need at least two metres in the middle – narrow cabinets could give a little extra room in small spaces, whilst clever corner units mean you won’t lose storage.
Works best for: medium-sized spaces.
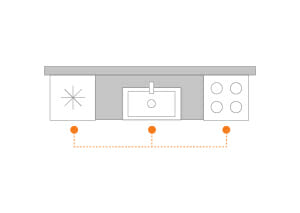
Single wall
Quite self-explanatory, the single wall layout is an alternative to a galley for small spaces that are particularly dark or narrow. Though the working path isn’t as practical as other layouts, so long as you consider the three main working zones and keep enough counter space between each one it can still be effective.
Works best for: very narrow spaces.
The galley is so-called after kitchens found aboard ships, featuring two parallel rows of units. It’s also sometimes known as a corridor kitchen, offering a fair amount of counter space and decent storage with a long and narrow design. Ideally, position the hob opposite to the sink to keep the two areas distinct.
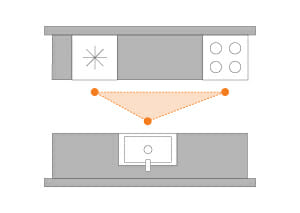
Be careful not to add too many wall cabinets, as this can make the space feel too enclosed and accentuate the narrowness. Use light colours to make the room brighter, using open shelves for extra storage instead.
Works best for: small, narrow spaces or in an open plan with a central island unit.
One of the most popular layouts in recent years, the island kitchen provides plenty of worktop space whilst creating a striking visual centerpiece. In theory, if you’ve got the space, any of the layouts can feature an island but the most common is incorporated into an L-shape design.
Depending on how you plan to use your island, it can serve different purposes. You could place the hob on it to cut down the distance between each workstation, or by overhanging the worktop you can create a dynamic breakfast bar where you can relax and entertain. For maximum functionality, place all of the working elements on one side of the island so that you don’t have to constantly walk around it.
Works best for: large rooms.
Once you’ve settled on a layout, you can start thinking about how you want your kitchen to look and feel.
To help guide you, check out our Project Checklist to map out the journey that brings your dream to life.
{{ subtitle }}
{{ i.desc }}
{{ subtitle }}
{{ subtitle }}
{{ i.code }} {{ i.title }} {{i.custom_badge}} New {{i.low_silica_badge}} Limited Stock
This website uses cookies to improve your experience, enhance site navigation, analyze site usage, and assist in our marketing efforts. Find out more in our Cookie Policy and Privacy Policy